Content Fresh

Keeping Content Fresh & Fun

Content FreshCreate Content that Makes an Impression

It’s no easy task to create content that attracts readers and is informative and helpful enough to keep them coming back. Readers can go anywhere to find content—the blogosphere is crowded—so you have to differentiate yourself and stand out.

While this can be difficult, by creating high quality content that sticks with your readers and makes an impression on them, you can keep them coming back (and telling their friends about you!). So, how do you do that?

Use High-Quality Images

While it may sound overrated, one of the easiest and quickest ways you can boost the quality of your content is by using high-quality images. You should include these images in every blog post you post or newsletter you send.

Images help paint a picture for the reader and help him or her envision what you’re talking about in the text. Keep in mind that these images should pertain to the content you’re sharing. You can read our post “How to Select the Right Social Media Images for Your Content” to learn more.

Switch Up Your Content Type

Keep your content fresh by switching up the type of content you share. If you recently posted a long-form blog post, share a checklist, infographic, or video. When you change your content, you keep your readers from growing tired of it.

If they come to expect quality content from you, they’ll know that no matter the format, you’re providing something of great value on your blog.

Share Content Where Your Interested Customers Are

There are many reasons why you need social media to drive customers to your website. Once you’ve created your content, you need to share it (which you likely know), but you need to share it where your interested customers are.

As a real estate agent, your content isn’t necessarily going to attract your targeted audience if you share it in a LinkedIn group for real estate professionals. Sure, if the blog post is about a recent property you’ve listed, it might help agents in your area discover it for their potential buyers, but you need to share it where your customers are hanging out, which may be places, such as: Facebook, LinkedIn, Pinterest, or Instagram.

How You Share Content Matters

How you share your content is incredibly important. When you just share the URL to your blog post in a social media post, your post looks like it has a fun-factor of zero. The URL doesn’t provide any background to the content or tell readers why they should take the time to click on it and read it.

Share a sentence or two that describes what the content is and how the viewer will benefit. By doing this, your reader is more inclined to click on your post and visit your website. When you do it properly, you’ll drive more traffic to your site. It’s the art of alluring.

Include Social Sharing Icons

Social sharing icons help readers share your content with their friends, family, and networks. Content is more fun when you can share it with others, right? And, when people share your content, they help spread awareness about your service and offerings.

Don’t forget the Goal of Content

Remember, the goal of content is to build a relationship with each person who visits your site or reads your newsletter. You want to grab their attention and make an impression, so you can ultimately build a long-lasting relationship. By following these guidelines, you’re on your way to doing just that by keeping your content fresh and fun.

marketing-secrets

12 Secrets No One Shares About Real Estate Marketing

marketing-secretsYou know there is a way (or a ton of ways) to really grow your real estate marketing business; however, it’s difficult to sort through the massive amount of information available. You can be overwhelmed with where to begin—even though you’ve come across some really great articles about traditional and online marketing.

Let’s shine some light on some real estate marketing myths, because when you know what doesn’t work, you can move right into what does. We’re also going to cover effective offline and online marketing strategies, so you can begin growing your business.

Most of the time, it’s not that a real estate marketing idea has failed, it’s that it hasn’t been implemented properly or your expectation surrounding its impact is a bit off.

Here are some hidden secrets no one shares:

1. You don’t get leads immediately after you obtain your license.

Leads don’t come to you merely because you’re now a licensed real estate agent. You need to engage in strategic lead generating activities right away, so you can get the ball rolling.

Here are some great resources for how to drive traffic to your website and generate leads using traditional and cutting-edge strategies:

2. Listing calls rarely just fall into your lap (even from friends).

You might have friends and family members who have promised you, you can list their house or help them buy one. The challenge is that experienced agents are groomed for how to talk your friends and family members out of trusting a “newbie,” even one they have a relationship with.

They’re given scripts that prompt them to ask questions, such as: “Do you want to jeopardise your relationship or friendship?”

You’re still going to have to provide excellent value and showcase your expertise if you want friends and family to trust you.

Here are some resources for how you can provide more value:

3. Blogging and marketing materials are effective OVER TIME.

A misconception that goes along with real estate marketing is the amount of time it will take for you to draw others in. The premise behind marketing is that you have to change people’s behaviours so they do business with you. It takes time to change others’ behaviours.

Blogging is one of the most profitable real estate marketing strategies, but it takes time to see the return on investment. It’ll likely take at least six months for you to see the return. You have to remain dedicated.

4. Google Ads aren’t 100% guaranteed. 

Paid ads on Google, Facebook, or any other ad aren’t guaranteed to work. On average, people need to see an advertisement at least seven times before they will act. You have to stick with it and continue putting yourself out there, even if you’re discouraged because you aren’t seeing results yet.

5. You’re more than an agent—you’re starting a business. 

Don’t think of yourself as merely an agent. In reality, you’re starting your own business. A business owner’s mindset is different than an agent’s, and you need a business owner’s mindset to truly succeed. Here are some things you should be doing if you’re operating in that mindset:

  • Document each and every thing and follow a system
  • Designate certain roles—even for yourself—so you eventually have some free time. Put on your different hats and take them off—at least until you can hire an assistant.
  • Focus on growth and limit the time you spend on activities that don’t foster that growth.
6. Small successes will add up to big successes. 

Don’t focus on once-off lofty goals like a number of agents do. Things like “I’m going to sell one expensive home and go on vacation for the remainder of the year,” are counterproductive. Focus on little successes and believe they will add up (because they will). It’s more profitable to focus on the deals that will build your track record and build from there. The big deals will come, but don’t limit yourself by only focusing on them.

7. Keep your real estate domain throughout your career. 

Your search engine ranking is important and a lot of agents change their domain names over time or they hop from agency to agency and only have landing pages.

Think outside of the box. Create an SEO-friendly domain name and build your site, so that no matter where your career goes or how it changes, your platform remains unchanged.

8. Content creation is king. 

Content creation is still king, and content marketing should be in your real estate marketing strategy for at least the next five years. Real estate is becoming an even bigger and bigger online marketing industry. Some real estate blogs publish five blog posts a day, some five blog posts a week.

Blogging is incredibly important, and content in general is important—whether that content is in the form of blog posts or YouTube videos or other social media posts.

9. Use systems and processes to prevent overwhelm. 

When you’re operating like a business, you create systems and processes like a business. Use systems that help you avoid email clutter and CRM systems that allow you to manage your drip email marketing, including email templates.

By implementing systems and processes, you can avoid writing out the same emails over and over and over. You’ll avoid repeating so many things. Systems will take the load off of you and keep you sane.

10. Online and offline marketing need to occur simultaneously. 

You can and should implement both online and offline marketing strategies, even though online marketing is where real estate is moving towards. Create strategies, including content marketing strategies, and set goals. Then, decide which offline and online marketing activities will help you achieve those goals.

11. Buyers are easier to start with. 

Some real estate agents like to work with seller leads and other agents like to work with buyer leads.

It’s often considered best—in the beginning—to focus on buyers, so you can get some excellent testimonials. Sellers are often hard to convert at first, but buyers don’t always care as much about the experience as long as they walk away with the home of their dreams.

12. People don’t remember the first time you post.

Don’t post your content or your marketing information and hope leads start rolling in. If you do an activity once, people typically don’t convert the first time….

or the second…

or the third…

Money is made in real estate by consistent branding over time. Whether you’re a brand new agent or an agent who has been at it for years, you have to repeat your marketing at a nauseating level. If you’re struggling to identify your brand voice or build your brand with clients, check out these helpful resources:

Now that we’ve debunked some myths and given you some tips for how to achieve even greater real estate marketing success, are you ready to get started?

If you’re just getting started and want to build your own SEO-friendly and mobile-friendly website, we’d love to help begin building your platform. Contact us for more information.

New Update Sticker for iDashboard Products

New Workspace Functionality

New Update Sticker for iDashboard ProductsThe team at iProperty are proud to announce a New Update to iDashboard, below is a summary of the main items that have been updated.

Workspace

Workspace has had a facelift along with the addition of some great new functionality, allowing you to do more bulk actions with your contacts.

Workspace is your temporary space to work with contacts and perform bulk actions, including merging documents, sending an SMS or email, adding categories, changing owners or adding notes. You can add contacts by clicking on the Wand icon next to a contact name throughout iDashboard. Removing a contact from Workspace does not delete or archive them.

From the Workspace you can now preform the following actions:

  • Merge Documents
    This tool allows you to bulk mail merge the contacts in your Workspace to mail merge documents you have uploaded to iDashboard.
  • Send SMS
    This tool allows you to bulk SMS the contacts in your Workspace.
  • Send Email
    This tool allows you to bulk Email the contacts in your Workspace.
  • Add Categories
    This tool will add the chosen categories to your contacts in Workspace. If a contact is already in a category or multiple categories, then the chosen categories will be appended to the contacts existing categories.
  • Change Owner
    This tool assigns the contacts in your Workspace to a particular Employee in the system.
  • Add Notes
    With this tool, you can easily add a single note to all the contacts in your Workspace.
Newsletters

Content Ideas for Your Real Estate Marketing Newsletter

NewslettersSending email marketing newsletters helps real estate agents stay connected with potential buyers and sellers. Many real estate agents, however, are not aware of some of the basic tracking and measurement tools that help monitor the success of a newsletter. By understanding the response you receive from each newsletter, you’ll uncover what works best and be able to tweak it for greater success.

Often times, tweaking your email newsletter may simply mean sending your readers more valuable content. We’ve also included some newsletter content ideas below.

The Basics of Real Estate Marketing Newsletters

Let’s cover some basic terminology and measurement tools, and then we’ll discuss some ideas for relevant content that will help your clients see the value in your newsletter.

Open Rates

An open rate indicates how many people open up the email that you send. At August 2015, the average open rate for real estate was approximately 22.03%, according to a MailChimp Email Survey. This rate will give you a benchmark to go off of, so you can identify if your open rate is above or below average. If you use email marketing software, you should be able to find your open rate per newsletter by looking for your analytics.

Factors that affect your open rate include: your subject line, the familiarity of your name, the time of day you send, and whether your recipients are actually interested in buying or selling, to name a few.

Newsletter Subject Lines for Real Estate Newsletters

Likely, your subject line is going to be a key factor that determines whether a recipient will open your email. Try to think of a unique call to action that solicits curiosity. Compel your recipients to open your email.

Imagine for a second that you are sitting at your computer. You have a long to-do list, tons of things on your mind, and a phone that keeps pinging when an email from your family doctor pops up. The subject line reads “Dr. Hank’s October Newsletter.” While you love your doctor and you intend to read the email at a later time, you’ll likely get busy and forget about it because you weren’t compelled to open it right away.

Now imagine you receive a newsletter from your family doctor with a subject line that reads, “We’ve helped TEN people beat the flu this season and want to tell you how to help prevent it!” Do you feel like you’re more inclined to open this newsletter?

Get creative and make the subject line about your recipients so they’re more likely to open it and read it.

Content: What Should You Write About?

Here are some great content ideas for your real estate marketing newsletters. These topics will help you keep your content fresh and valuable for your potential buyers and sellers.

Market Trends
  • The number of homes listed in your area or city
  • The number of homes sold in your area or city
  • Average price of homes sold in your area
  • Most expensive homes sold in your area or city with pictures
  • Least expensive homes sold in your area or city with pictures
  • Strangest or most unique homes sold in your area or city
  • Average number of beds and baths sold in your area or city
Local and National Real Estate News and Events
  • Celebrity homes for sale
  • Celebrity real estate agent videos
  • Beautiful homes from around the country
  • Anything mentioned in the media about real estate or real estate investment
  • Local events, concerts, or neighbourhood markets
Design, Décor, or Home Renovations
  • Trendy paint colours and décor
  • Traditional and modern design styles
  • Before and after photos of home renovations
  • The impact laminate floors may or may not have on home value
  • The impact of solar panels on a home’s value
  • Lighting tips and options
How to Articles
  • How to buy a home (for first-time home buyers)
  • How to proceed when your offer is rejected
  • How to negotiate an offer to purchase
  • How to stage your home to sell at the top price range
  • How to remodel your home for the best returns
Landscaping and Yard Tips
  • Interview a premier landscaping company (tips for a beautiful landscape)
  • What do buyers look for in a yard
  • What is edible landscaping and do buyers appreciate it
  • What are the best plants and hardiest trees for your climate
  • Yard checklist for your open house
  • How to properly mow a lawn

These are just a few content ideas for your real estate marketing email newsletter. We hope you have some new insights and ideas for how you can provide valuable content to your subscribers.

New Feature Sticker for iDashboard Products

Introducing the Health Dashboard for Salespeople

New Feature Sticker for iDashboard ProductsLast month we introduced the Health Dashboard for Principals and Office Managers which was received with wide applause.

We have now extended this great feature of iDashboard through to Salespeople.

What if a system like iDashboard could tell you everything you need (or want) to know about your own business as a Salesperson in one neat and compact screen? That’s what we have done with Health.

The main purpose of iDashboard is to help you manage your prospects, listings and database in a way that helps your business succeed. That’s why we have developed a simple yet powerful way to measure your business at a glance.

The new Health screen is an information management tool that is used to track live KPIs, metrics, and other key data points relevant to your Real Estate business. The new Health screen simplifies data sets to provide users with at a glance awareness of their office and their employees current performance.

In order to see the new Health screen users must have their profile set to Sales.

This new Health screen displays the following live data for Sale properties:

Appraisals
  • The total number of Appraisals
  • The total list value of Appraisals currently in iDashboard (based on the Lower Appraisal Price)
  • The approximate GCI of Appraisals (based on your Base Commission setting in Admin)
  • The number of new Appraisals conducted this month
  • The number of Appraisals lost to a competitor this month
  • The number of Appraisals rejected this month
Listings
  • The total number of Listings
  • The total list value of Listings currently in iDashboard (based on the Lower Listing Price)
  • The approximate GCI (based on your Base Commission setting in Admin)
  • The number of new properties Listed this month
  • The number of Listings that are older than 60 days
  • The number of Listings Withdrawn this month
Contracts
  • The total number of properties that are Under Contract (based on status)
  • The total contract value
  • The approximate GCI (based on the Selling Fee of each property and your Base Commission setting in Admin if a contract property does not have a Selling Fee set)
  • The number of new Under Contract properties this month
Solds
  • The total number of properties that are Sold (based on status)
  • The total contract value of your Sold properties
  • The approximate GCI (based on the Selling Fee of each property and your Base Commission setting in Admin if a sold property does not have a Selling Fee set)
  • The number of new Sold properties this month
VPA Outstanding
  • The total number of Listings and Contracts that have a negative Vendor Expenses balance
  • The total value of all negative Vendor Expenses

Vendor Expenses can be both debited and credited on individual properties – if there a more debits than credits on a property then it will contribute to this card. Expenses can be amended on the Expenses tab inside each individual property. Refer to Office Reports >> Outstanding VPA for a list of all properties with a negative Vendor Expense balance.

Days on Market
  • The average days on market for the last 90 days
  • The average days on market for this financial year
Contacts
  • The total number of active contacts in your database
  • The number of new contacts added this week (week begins on Monday)
  • The number of new contacts added this month
Visitors
  • The total number of Visitors this month (via both Open Homes and Private Inspections)
  • The number of scheduled open homes you have coming up in the future
  • The average open home traffic (average visitors per open home)
  • The number of private inspections held this month
  • The number of open home visitors that have not attended one of your open homes before (new visitor)
  • The number of open home visitors that have attended more than one of your open homes (repeat visitor)

Open Home and Private Inspection visitors can be added and tracked via the Inspections tab inside individual properties.

Agent Rankings (Last 30 days)
  • Appraisal Count (#)
  • Appraisal $
  • List Count (#)
  • List $
  • Settled Count (#)
  • Settled $
Sales Funnel
  • Appraisals
  • Listings
  • Contracts
  • Solds
  • Settlements
Property Web Views

Property Web Views shows you the Hits on your website for the Last 7 Days, with the ability to show the week prior.

The Sales Funnel and Property Web Views charts can be printed as well as downloaded in PNG, JPEG, PDF & SVG formats, ideal if you want to include them in team briefings or presentations.

health-principals

Some employees may experience higher than expected counts or values on Appraisals and Solds – this is caused by not advancing properties to their next status. With Appraisals, they can be advanced to Lost, Rejected or Listed – if you have a lot you may want to clean some out by moving them to Lost or Rejected. Similarly with Solds, these need to be advanced to Settled. You can click on the headings of the Appraisals, Listings, Contracts and Solds cards to see those properties on the Real Estate tab.

Remember, this new screen in iDashboard is only visible to users who who have ‘Sales’ set as their profile. If you are a Salesperson and are unable to see this screen, feel free to contact our friendly support team who will be able to assist you.

New Website Sticker for iProperty Products

New Ruralco Property Website

New Website Sticker for iProperty Products
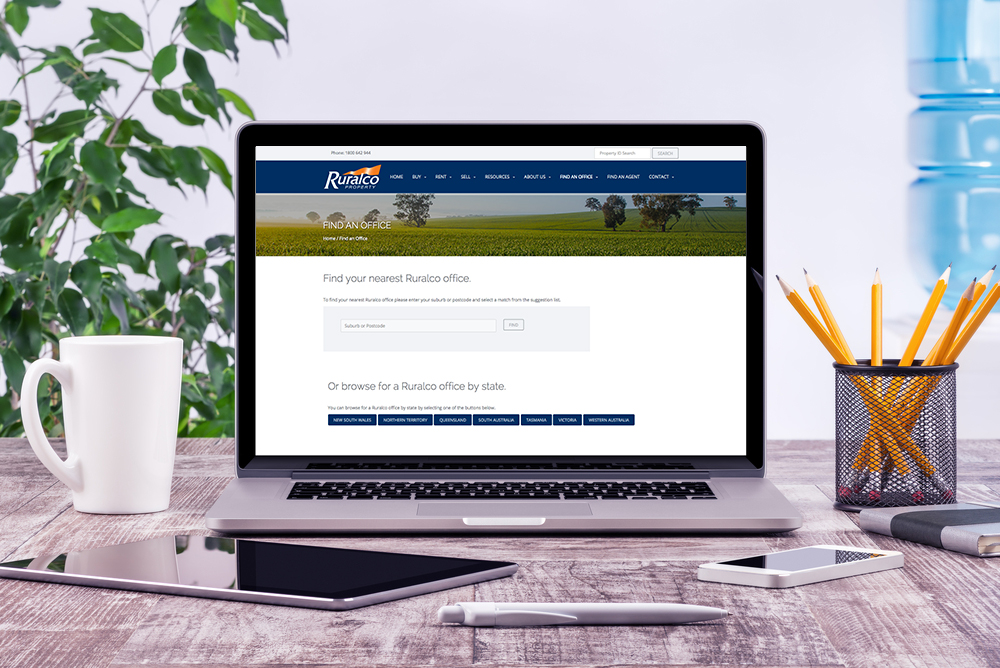
Ruralco came to iProperty looking to upgrade their national Ruralco Property website to a modern, responsive website design.

The new Ruralco Property website is completely responsive; working on Desktops, Tablets and Smartphones allowing their staff and visitors from all across Australia to access any property any time.

The new interactive home page contains a great list of ‘must-have’ features, this includes:

  • Property Search Panel
  • Property ID Search Panel
  • Featured Property Gallery
  • Our Services Quick Links
  • Latest Listing on Home Page
  • Clearing Sales
  • Recent Testimonials
  • Submit a Testimonial Interactive Form
  • Buying & Selling Tips
  • Interactive Mortgage Calculator
  • Market Appraisal Request Interactive Form
  • Find an Office & Find an Agent Look Up Tools
  • Latest Sold Properties
  • Latest News and Updates
  • Property Videos
  • Detailed Rural Property Information
  • Interactive Maintenance Form
  • Social Media and Contact Links

Along with this fantastic new home page, the website boasts a revamped property grid list view, property information pages, interactive forms and many more professionally designed features.

The team at Ruralco Property were very happy with what was produced and we wish them all the best with their new website and look forward to our ongoing relationship.

If you are looking for a new website, wether you are starting from scratch or want to upgrade to a modern responsive design, contact iProperty today.

Ruralco1 Ruralco2 Ruralco3

Email Best Practice

Drip Email Marketing Best Practices

Email Best Practice
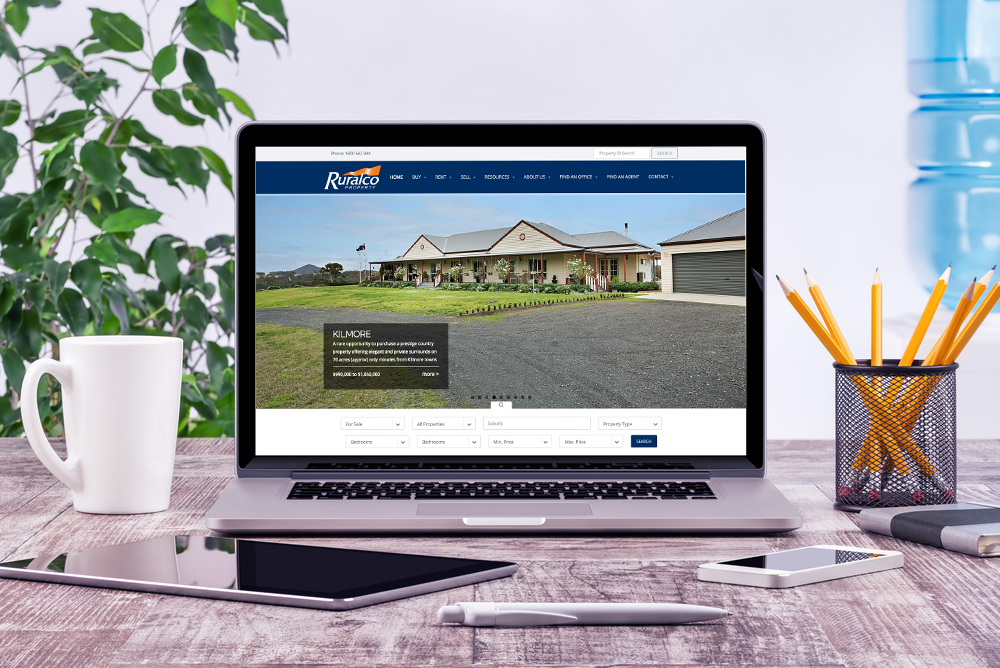
When it comes to drip email marketing campaigns, there are a few best practices. First of all, you need to utilise premier email marketing software that allows you to segment your email list. If all you have is great software, however, it will be difficult to determine how to structure your campaign and understand your efforts. Use these best practices to ensure you craft a successful drip email marketing campaign.

  1. Know Your Goals

Create specific goals that delve further than just increasing your leads or driving traffic to your site. Think through what you want to improve and the metrics you want to measure. When you know your goals, you’ll better understand the best way to format your emails in order to achieve those goals.

For example, do you want to get more traffic to a certain landing page that contains neighbourhood specific information? You can set up a workflow that tracks leads who are interested in purchasing homes in that specific neighbourhood and provide additional links to your site with more information about the neighbourhood. Monitor the open rates and click rates and continue sifting out cold and hot leads so you can adjust your message and content. Being meticulous and thorough in your goal setting and monitoring will help you see results with your email campaigns.

  1. Define Your Message

Writing the content for your emails and developing your message can be time consuming unless you use templates or delegate this step of the process to an assistant. There are many ready-made templates that can help you streamline the process and ensure you start off using a foundation that’s been proven.

If you do pick a template, make sure to properly brand it and focus on your message. If your goal is to drive buyers and sellers to the resources on your page, you might promote this differently than you would homes for sale. For example, you might:

  • Send an email that lets your leads know you offer buyer and seller resources on your website.
  • Send every lead who downloads any of your resources an email with relevant information regarding the market in your neighbourhoods.
  • Send an email a couple of days later that features some of your blog posts with buyer and seller tips to help nurture and educate your leads.

By defining your message, you can strategically tailor it to each lead rather than bombarding your leads with random emails that are unsuccessful.

  1. Pinpoint Your Timing

There is lots of information online about the frequency and timing of sending out emails. This, however, differs for individuals and industries—even for real estate agents.

A rule of thumb is not to bombard your subscriber list, because it may cause leads to opt out of your emails. It’s best to nurture your leads with slow and steady emails and then as you move them along the sales process you can increase the frequency.

If you, for example, have a lead who has clicked on multiple pages on your site, including blog information about selling a home, you need to act quickly. Don’t send emails out once every two weeks, but be more aggressive by sending an email a couple or a few times per week.

  1. Monitor and Evaluate Your Lists 

Examine your leads and monitor activity throughout your drip email marketing campaign, so it’s effective. Make sure the leads are included in the right drip of the workflow or you won’t properly nurture them through the sales process. Nearly all CRM software allows real estate agents to score leads, but the score shouldn’t be set in stone. Some leads may find certain emails applicable, but over time they won’t and vice versa.

A hot lead that’s gone cold and is no longer checking out multiple listings a week should be moved from receiving multiple emails a week or month to perhaps receiving local market news or information once or twice a month.

  1. Adjust Your Message

You can’t define your message once and then leave it. It’s imperative you monitor what messages are and aren’t working and adjust them. If data reveals a certain email is not successfully moving leads through the sales process, you should change it. An email that doesn’t receive a high open rate or click rate allows you to focus your attention on a message that resonates more. Testing is part of marketing, so use this as an opportunity to find your sweet spot and the right mix. Don’t get discouraged because an email isn’t working.

With these tips and best practices in mind, consider getting started on your next drip email marketing campaign.

Email Newsletters

Drip Email Marketing and Automated Email Campaigns for Real Estate Agents

Email NewslettersThanks to technology and the advent of automated email marketing software such as iDashboard, long gone are the days of sending out individual emails to clients and manually tracking them. You no longer have to painstakingly segment each lead and determine what communication to send.

You can create real estate email marketing campaigns that consist of newsletters and other promotional information.

One of the biggest challenges for real estate agents with email marketing is determining what lead should receive what type of email and when they should receive a certain message. By following the drip email marketing process, it’s easier than ever for real estate agents to build their campaign and start successfully marketing to leads.

Let’s talk about drip email marketing campaigns and what a detailed email marketing process might look like.

Drip Email Marketing for Real Estate Agents

Drip email marketing is basically an automated process of sending emails to leads and different segments of your email subscriber list. For example, if individuals visit your site and subscribe to start receiving your email newsletters, they can begin to receive emails which you’ve already created to help nurture them through the sales process.

The first email a subscriber might receive is a welcome email and then the second and third emails might provide an overview of where he or she can find you on social media and what you provide on your website.

The sequence in which emails are sent is referred to as drip workflows. These sequences are based on: where the lead comes from (ad, website, landing page) and their activities as they pertain to your website (do they download certain guides, favorite your blog, etc).

While there are many drip email marketing campaigns you can set up, here is an example of a very basic one for your subscriber list:

When a lead fills in a form to download a free eBook regarding home buying on your website, the first email they receive may say: “Hello! Thank you for subscribing to my newsletter. Download your free home buying guide here.”

If the lead then clicks on the link to download your free eBook, send them an email that looks like: “Hello! Here is more content from my website you may like.”

If the lead again clicks on your link for more content, you could send them an email, such as: “Good Day, I’m glad you found the eBook helpful! Do you need representation or want to discuss some of your questions regarding buying a home?”

If the lead doesn’t click on the link to download your free eBook, you may send an email similar to: “Hi Again! Don’t forget to download your free guide to purchasing a home.”

If the lead still doesn’t click on the link to download your free eBook, you may send an email, such as: “Hello Again, you may find this content more helpful!”

This is a very basic drip email marketing campaign, but we hope you find the structure helpful so you can begin brainstorming how to piece your workflow together. You most definitely might want to create a longer nurturing process. This workflow, however, helps demonstrate the reasoning behind sending drip email campaigns.

Think about a drip work flow this way: If a visitor comes back to your site again and again and favorites many of your listings, they’re likely a hot lead. You need to take advantage of their clear interest with drip messages that showcase your ability to help. Leads that favorited your listings a few months ago and then stopped visiting your site are cold leads; they can be part of a separate, less urgent campaign.

Drip email campaigns help you send timely and relevant communication to your leads. It is one of the most effective leader generation and nurturing tactics.

New Update Sticker for iDashboard Products

New Custom Contact Fields, Menu Options & Reports

New Update Sticker for iDashboard ProductsThe team at iProperty are proud to announce a New Update to iDashboard, below is a summary of the main items that have been updated.

Custom Contact Fields

Offices sometimes require details from customers that are unique to that customer, or your office may require particular details to be collected that are unique to your business. iDashboard now has the ability to create your own custom fields for contacts. When you create these fields you are also provided a merge field so that this new data can be utilised in merged documents and email compositions. Administrators and Principals can easily setup these new Custom Contact Fields by heading to ‘Admin & Account Settings’ then click on the ‘Edit’ tab under your Company Details screen, there you will find a ‘Custom Contacts Fields’ tab. Simply enter in your required custom fields and click ‘Update Agency’. You will now find these new custom fields under the ‘Other’ tab when editing a contact, along with the merge field that applies to that Custom Contact Field.

‘My Office’ Menu Options

Accessing your offices listings as a Principal and Administration user is now even easier. Under the ‘Real Estate’ tab in iDashboard there is now a new menu option called ‘My Office’. From this ‘My Office’ menu, users can now easily access the following without having to preform a search:

  • Active Listings
    • Appraisals
    • Listings
    • Contracts
  • Closed Listings
    • Solds
    • Settlements
    • Historical Settlements
    • Leased
  • Lost Listings
    • Withdrawns
    • Lost to Competitors
    • Rejected
SMS Mobile Number

Sending SMS’s from iDashboard is easy and convenient, but sometimes users need to send SMS’s on someone else’s behalf, or maybe you don’t want to advertise your mobile number, but need to send SMS’s from iDashboard. We now have a new user details field called ‘SMS Number’, here you can enter the mobile number you want the SMS’s you send from iDashboard to come from. If no number is entered here, the system will simply utilise your Mobile number. If a user doesn’t want to advertise their mobile number, simple enter a SMS Number and leave the Mobile Number blank. To edit or add in a SMS Number, simply head to ‘Admin & Account Settings’, then ‘Employees’, click on the employee we wish to add a SMS number for, then click on the ‘Edit’ tab, lastly click on the ‘Contact’ sub tab and add in the SMS Number and hit ‘Update Employee’.

New Report – Monthly Anniversaries

This report shows you Vendor or Buyer anniversaries for a particular month. Anniversaries are collected by month since you started using iDashboard.

New Report – Selling Fee Variances

This report compares your Base Commission to the Actual Commission you earn on each settlement. This report can be a good indicator to see if your agency is discounting commission or reaching goals.

social profile bio

How to Customise Your Bio for Each Social Platform

social profile bioEach social media platform structures bios differently, has them in different places, and has their own space restrictions. The sites continually release updates to their layouts and features, so be on the lookout for those, but here are some basic best practices for the major social media sites.

Facebook

Facebook provides you with a couple of options for your bio. A tagline bio is available on your main page and then there is an “about” field with space to include your tagline, company info, mission, and description. The amount of space will vary depending on whether your page is set up for business or personal use. Be specific and descriptive in this bio, but also as concise as possible.

Use trigger words that potential clients can aspire to, such as: smart, useful, applicable, etc. Showcase a value statement, such as “My website provides informative, expert-level content and the latest property deals.”

Facebook Bio Best Practices:
  • Include website link or landing page link in your short bio
  • Be descriptive and specific in your “about” bio
  • Use keywords for SEO

Twitter

Twitter has a 160 character space restriction, so you need to be to-the-point and specific in your bio. Add your title, noteworthy accomplishments, and a bit of your personality.

Use language that hooks readers and makes them want to visit your site.

Twitter Bio Best Practices:
  • Add URL and city in bio
  • Consider a call to action with link to a landing page or website
  • Use keywords for SEO
  • Use the cover photo for more detailed info

Google+

Your Google+ bio is tied to your google account, so it should have relevant information, website links, keywords, and contact information. You can fill in a lot of information in your Google+ bio, but we’ll focus on the “story” section. This section includes:

  • Tagline—A brief introduction to who you are. It’s recommended that you use 10 words or less, but this is not enforced.
  • Introduction—This is the “meat” of your bio. This is where you say who you are and what you’re about. There’s no limit to the amount of space you can use.
  • Bragging Rights—This is where you can talk about your personal or professional accomplishments.

Make sure to fill in each one of these spaces with relevant information and keywords.

Google+ Bio Best Practices:
  • Include a compelling business summary
  • Use keywords for SEO
  • Add links and other social media platforms

LinkedIn

LinkedIn is by far the most professional networking site, so, while you should keep your brand consistent, this is the place to showcase your accomplishments and experience. In the “Summary” section, there are no space restrictions, so you can be as thorough as necessary (while still keeping it compelling).

LinkedIn Bio Best Practices:
  • Add a headline next to your profile picture and under your name
  • Include your short, website link (iproperty.com.au) in your headline
  • Use keywords for SEO 

Pinterest

Pinterest is the visual story-telling medium. It’s the place where your interests, passions, and hobbies are expressed, so you should tie those interests into your bio. Your bio is limited to 160 characters, so you’ll have to be to-the-point. Give people what they need to know about you in the most concise way. For example: Your go-to guy for real estate & all things local in {insert area}. Family Man. Adventurer.

Pinterest Bio Best Practices:
  • Add interests that match your boards and pins
  • Use keywords for SEO


Do you have your bios filled in on every social media site? Did this article give you some good tips, so you can either fill them in or refine them for improved success and appeal? Are you at least following these 8 profile picture rules for your profile pictures on each platform?

Did You Know? - Blog

Did you know about Workspace?

Sometimes you need to preform a bulk action on a selected bunch of contacts, with WorkSpace in iDashboard you can do this easily with a few clicks of your mouse.

WorkSpace is a feature in iDashboard, which can be accessed via Contacts.

WorkSpace allows you too perform bulk actions on contacts including generating a bulk mail merge document or sending a bulk Email or SMS, as well as adding categories, changing the owner, adding notes and archiving contacts at bulk.

With the ability to add contact searches to WorkSpace the opportunities are endless for who you can send to.

You can add Contacts to WorkSpace by performing Contact Searches or by choosing individual contacts.

Adding Contacts via Contact Search

  1. In iDashboard click on Contacts.
  2. Choose either the General Search, Buyer Match Search or Last Contacted Search; and perform your desired search.
  3. Once your Search Results are displayed click the Add search results to Workspace button at the bottom of the page to add your contacts to WorkSpace.

Adding Individual Contacts

  1. In iDashboard click on Contacts.
  2. Select the contacts you would like to add to WorkSpace by ticking the box next to each contact.
  3. Once all contacts are selected select the Add to Workspace option from the Bulk Actions drop down menu located at the bottom of the page.
  4. Click Apply.

Remove all contacts from WorkSpace

  1. In iDashboard click on Contacts.
  2. Locate the WorkSpace section in the left hand sidebar.
  3. Click Empty.

Remove individual Contacts from WorkSpace

  1. In iDashboard click on Contacts.
  2. Locate the WorkSpace section in the left hand sidebar.
  3. Click on the word Contacts in WorkSpace.
  4. Click the red x next to each contact you would like to remove.
social media bio

10 Must-Read Tips for Writing Great Social Media Bios

social media bioAccording to Business Insider, a recent study revealed that Americans spend about 27 percent of every hour on social media—that’s more time than on any other internet activity. The same is likely true for Australians. As a society, social media has taken over every facet of our lives—from how we socialise to how we do business.

What Does the Social Media Craze Mean for Your Business?

As you’re well aware, your leads and potential clients are hanging out on social media, which means you have to be there to attract them. It’s one of the most important channels for sharing your content. Many clients use social media as a search engine to find information on home buying and home selling.

Often times, potential clients will read your social media bio before they head over to your website or check out your content. You need to hook them with your bio, so they explore your offering further. Customers get to know you by your brand personality—by what you put online. They read about you to find out if you might be a good fit for their needs.

Use these 10 tips to create a strong social media bio that leaves a lasting first impression and gets clients interested in you.

10 Tips for Writing a Great Real Estate Agent Social Media Bio

  1. Focus on Your Track Record

Whether potential clients come to you because they’re buying a home or selling a home, they want to know you’re a real estate agent who gets results. Use action verbs that showcase your abilities. For example, “close an average of five sales weekly” or “assist an average of five home buyers a week make offers.”

  1. Write Conversationally (In First Person)

Write conversationally and speak in first person and your bio will feel more personal. Speak about some of the following:

  • 2-3 defining moments in your career
  • Personal attributes that are most beneficial to your clients
  • Who your target audience is
  • What makes you unique
  • How you solve buyer’s and seller’s problems
  1. Use Keywords

Think about at least 5 keywords that might impress buyers and optimise your page. You don’t want to write for SEO alone, yet you want to make sure that you’re strategically writing for the client, too.

  1. Avoid Salesy Jargon or Buzzwords

Make sure your content has a more social and professional feel than a salesy feel. Avoid buzzwords such as “guru,” “area expert,” or “top-producing.”

  1. Be Authentic

Use your social media bio to let your personality shine through. If you’re funny, add in a bit of humour. If you’re witty, add some wit. If you’re warm, add some charm. Remain true to who you are, so clients don’t get one feel online and a totally different vibe from you in person.

  1. Share a Value Proposition

Your value proposition lets your potential clients know what to expect from you. Your value proposition might be your proactive service and history of success or it might be the content you create. Give your readers a call to action (such as: follow, like, or subscribe) and a hint of what they can expect to read when they subscribe.

  1. Maintain Consistency

Consistency is crucial. Maintain your brand identity everywhere and on all platforms. You should provide the same information, just in different ways, in all of your bios. On Instagram and Twitter, your info will be short because space is limited. On Facebook, Google+, and LinkedIn you’ll have longer form paragraphs. Regardless of the space, define who you want to be and keep it consistent.

  1. Keep it Compact

Offer up the most important information and keep your bio concise. You don’t want to go on and on and on. Use it as a teaser to get them to want more. If your bio is long, see if you can say the same thing using half the words.

Get creative with your words. “Lux property lover” says the same thing as “I love selling luxury properties.” “I love to help my clients find their dream homes” is the same thing as saying, “Dream home finder. Period.”

Prioritize your words. Focus on information that resonates with your clients and makes them want to follow you for your services, not the fact that you’re a coffee addict or cat lover. There are tons of coffee addicts and cat lovers online, but there’s only one you. Choose words that showcase your unique selling point.

  1. Use Professional and Attractive Photos 

Your profile photo and cover photo are the first things that people see when they come to your site. There are many basic guidelines for choosing a proper profile picture, but make sure they’re professional, high-resolution images that are sized correctly. Use photos or your logo and make sure that they fit with your written bio.

  1. Keep it Updated

Things you once mentioned in your bio will change, you’ll learn more about crafting a great bio, or it will just get plain dated. Update your bio or revisit it every six months or year to keep things current and relevant. Your old followers and new followers will appreciate it.

Hopefully these 10 tips will help you freshen up your existing social media bios or actually fill in the information and craft a great social media bio that speaks to potential clients.